
<-----AD----->
Struggling with slow downloads in Firefox? It’s so frustrating. You click download, and then you just… wait.
I’ve got a simple fix for you. We’re going to connect Internet Download Manager (IDM) with your Firefox browser to help speed things up. It’s easier than you think.
In this guide, I’ll walk you through two easy methods to add the IDM extension to Firefox. One is a manual install, and the other is directly from the Firefox Add-ons store. Ready? Let’s get started.
How to Add the IDM Extension in Firefox

We’ll cover two ways to get the IDM Integration Module into Firefox. You can use the IDMCC file or just grab it from the Firefox Add-ons site. Both work great, so pick the one that feels right for you.
One quick thing: Before we start, make sure you’re using the newest version of Firefox and IDM. This helps prevent any odd problems.
Method 1: Add the IDM Extension Manually (Using IDMCC)
For this method, you’ll need the extension file. It’s called the IDM Integration Module, or “IDMCC” for short.
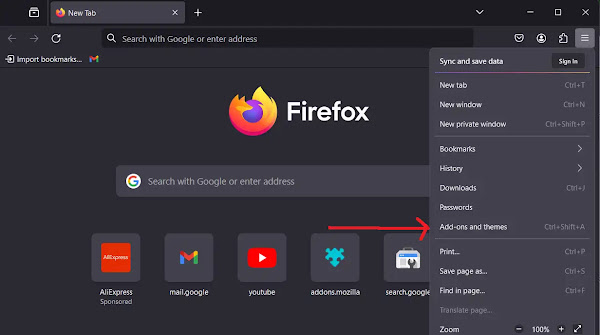
- First, open your Firefox browser.
- Find the menu button in the top right corner. It looks like three horizontal lines.
- Click it, and from the menu that drops down, choose Add-ons and Themes.
- On the new page, look at the menu on the left side and click on Extensions.
- Now, look for the small gear icon for settings and click it.
- From the small menu that appears, select Install Add-on from File…

- A file window will pop up. You need to find where IDM is installed on your computer. It’s usually located at
C:\Program Files (x86)\Internet Download Manager. - Once you’re in the IDM folder, find the file named
idmmzcc3.xpi. I remember the first time I did this, I was worried I’d pick the wrong file. Don’t worry, this is the correct one for modern Firefox. Click it.
- Click the Open button.
- Firefox will ask you to confirm. Just click Add.

- A message will pop up letting you know the extension has been installed. Success!

- You can click Close Page.
- One last step. Find the IDM Integration Module in your list of extensions, click the three dots (…) next to it, and then select Manage.

- Here, make sure “Allow automatic updates” is turned On and “Run on sites with restrictions” is set to Allow. This helps IDM work everywhere. You can also allow it to run in Private Windows if you want.

And that’s it! You’ve successfully added the IDM extension to Firefox. Now IDM should handle your downloads automatically.
Method 2: Add IDM from the Firefox Add-Ons Store
Don’t want to dig through your computer’s files? No problem. This way is even easier.
- Open Firefox and go directly to the IDM extension page. Here’s a handy link: IDM Firefox Add-on Page.
- You’ll see a big button that says Add to Firefox. Click it.

- Firefox will ask for your permission one more time. Click Add to confirm.
- And you’re done! The extension is now installed. See? Super simple.
By following these steps, you can easily get Internet Download Manager working perfectly with Firefox.
FAQs
How do I make IDM the default downloader in Firefox?
Once you add the IDM extension, it should automatically become your default downloader. If it doesn’t, open the main IDM program on your computer. Go into its settings and make sure the integration with Firefox is checked and enabled.
How can I download MP4 files instead of MKV?

Ah, a classic issue! To stop IDM from grabbing MKV files automatically, open the main IDM application. Go to Options, then click the File Types tab. In the list of file types, just find and delete MKV. Click OK, and you’re good to go.
What if IDM stops working in Firefox?
If IDM suddenly isn’t working, don’t panic. It’s usually a simple fix.
First, make sure both IDM and Firefox are fully updated. An old version of one can cause problems with the other.
Next, go into Firefox’s Add-ons menu and confirm that the IDM extension is actually enabled. Sometimes it can get disabled by accident. If that doesn’t work, try removing the extension completely and then adding it back using one of the methods we covered. A fresh start often does the trick.